How I Made A Linen Wrap Skirt With Rainbow Embroidered Flowers
Women's clothing and shoes can be either functional or pretty—rarely both.
Often, I opt for functional. My last pair of winter shoes were 8" high waterproof combat boots—highly functional. Never had wet or cold feet even ankle-deep in slush. They were awesome. But they were blocky; not sleek in the slightest. (I've switched to exploring barefoot/minimalist styles now, which seem like they may have a better balance of function to fashion than your typical shoe.)
When I choose pretty, I end up with a closet full of more skirts than I can wear in the season (I thrift them all), but none would last more than a season or two of heavy wear, anyway. Fast fashion ruined functionality.
Why can't I have both? A skirt that will last, but is also pretty?
Maybe I can. If I make it myself.
Designing a skirt
For this project, my inspiration sprouted from several garden plots: First, as mentioned, a dissatisfaction with modern quality of goods. Second, the Jan Brett books we've read with our children—fantastically detailed illustrations, often of traditional dress, with traditional embellishments and detail. And third, the various Jane Austen screen adaptations that Randy and I watched last year (what's not to love about the BBC Pride & Prejudice?), with delicate lace dressing gowns and young women constantly stitching away while gossiping about fine young men who make five hundred pounds a year.
This skirt project was going to be the opposite of fast fashion. Made from natural, strong materials; high quality; beautiful; detailed. Something I could wear for years and years.
The skirt, I knew I could make. The details? Guess I needed to learn embroidery, too.
Making the skirt
I looked up tutorials on making wrap skirts. i used their rules of thumbs for size and length and amount of fabric. My goal was a mid-calf skirt. Mine has four panels, each semi-wedge shaped, with two long ties.

I found a nice brown linen at Jo Ann's. I considered denim—known for its functionality—but decided against; it didn't have the lightweight, natural feel I was going for.
I remembered to prewash my fabric, and learned that linen frays like an Arctic hare shedding its winter coat. I read up on sewing with linen. Apparently I needed to learn how to sew flat-fell seams, which tuck the raw edges inside the seam, so it won't fray.


Eventually, I had a skirt!
Embroidery: Practicing flowers
The next step was embroidery. This was the part that would take a long time! Fortunately, I could work outside on the picnic blanket while the kids played in the yard.
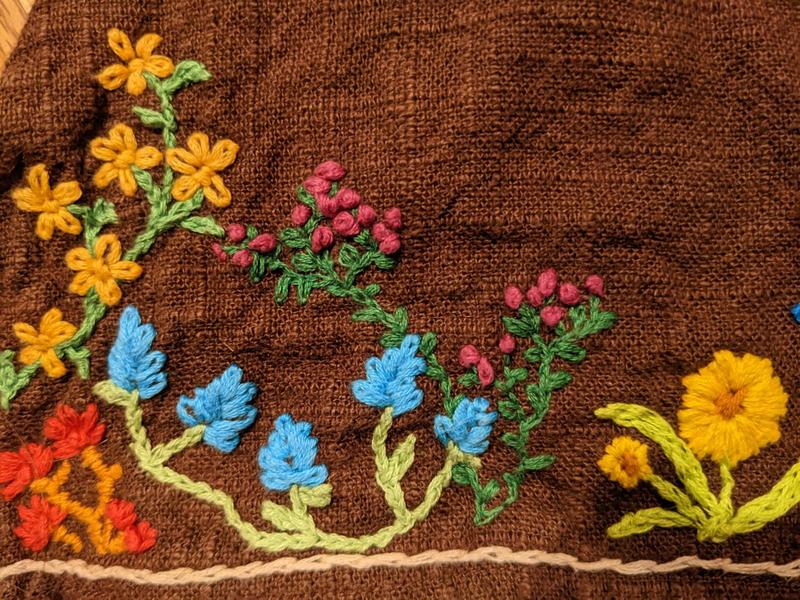
I decided to embroider flowers, a rainbow of roses, lilies, lavender, and whatever other flowers I dreamed up dancing along the skirt's hem. I looked up tutorials on different embroidery stitches, how other people liked to stitch flowers, then went to town trying each and making up my own.
Here's the sampler I made to try out different stitches and flower styles:

But that was enough practice. On to the skirt!
The skirt's flower hem
I didn't plan this out at all. It may look like I planned it—after all, there's some symmetry and pattern, some repeat colors.
But my process was this:
I stitched a flower. Then I stitched another, until it seemed like I had enough flowers of one color. Then I added stems, and leaves, until it seemed like there were enough. Then, I started on the next flower, in a different color.


Other embroidery
When one of my nice sweaters was snagged in the washing machine and got a hole, I decided that instead of tossing it, I'd try fixing it—after all, it was still a perfectly fine sweater, apart from that one little hole. I used a light yellow thread to pull the edges together and embroidered a little spray of purple flowers on top, neatly hiding and reinforcing the repair.

I did the same with a pair of jeans with holey knees. I sewed rectangular patches on the knees, then embellished them with embroidered flowers.

It's a fun new hobby. I'm happy with the results!

Book Review: A PhD Is Not Enough! A Guide to Survival in Science by Peter J. Feibelman
